
Manhattan bridge
Posted: May 2, 2016 Filed under: Third Year, Third Year Field Leave a commentMy lace boxes i have now decided are going to be inspired by the manhattan bridge. i designed a lid a while ago for the manhattan bridge but i wasn’t too keen on it. after looking at it again i decided that i actually don’t mind it.
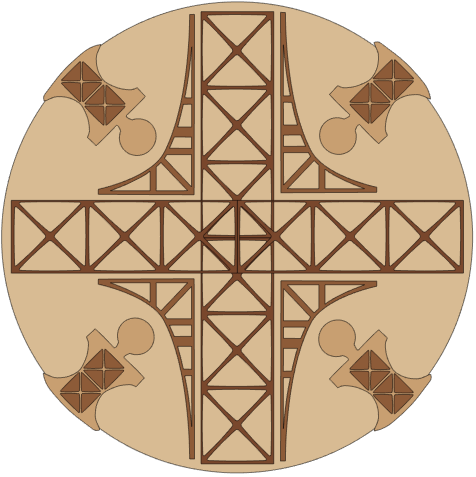
i didn’t think it was a subtle and flowing as the other lids i have designed, but then thought about the bridge and its not as flowing as some of the buildings I’ve looked at are.
I looked at this image for a while and went ahead with my making but then i decided to change the design around bit and made it so that it goes around the lid rather then on top of the lid.
 This design has been interesting to design i just have to see if the veneer will work around the lid after its been laser cut.
Bespoke Laser UK
Posted: April 27, 2016 Filed under: Third Year, Third Year Field Leave a commentAfter designing my living hinges i originally wanted to get them on the CNC machine at uni, the only problem was that my designs were very detailed and the smallest bit that they use on the big cmc is 3mm this then put me in a difficult place and i couldn’t laser cut the ply at uni because the laser cutter isnt a high enough wattage.
I was then told about Bespoke Laser Uk and emailed Laura to find out if she could cut my flexi ply to the shapes and designs i had done. Laura said that she would do a test to see if the laser cutter would cut the flexi ply for free, which it did. there was a small amount of charing around the edge but i am happy to sand or fix the charing in place.
Laura has been super helpful with cutting the boxes for me. i put together the file and got it sent to her she said that it was going to £50 for me to get the 5 boxes and lids cut. this then makes the price for each of my boxes at least £10 each without the cost of veneering and my time designing.

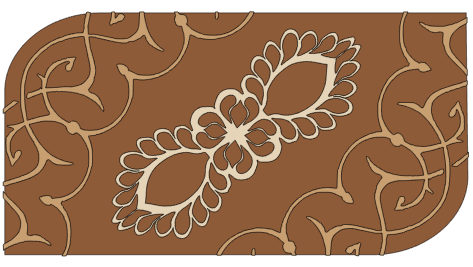
These were the files i sent to Laura and had them cut.
Formative Assessment
Posted: April 14, 2016 Filed under: Third Year, Third Year Field Leave a commentAt Easter we had a formative assessment again to check how we were doing with our plans and where we were planning to be by the deadline.
Advice on how you could improve this work in preparation for the final module assessment:
The development of the living hinge is a good move to add breadth to your box designs, the lids are progressing well however we have yet to see completed work, the level of finish will be important so think about that soon, the use of liberol could fill the gaps left by the laser cutter. You have a lot of work left to do in the time left but you are progressing, How you choose to present them is key to their success…continue to develop a range of designs, You need to identify who are your audience, your comparators, where is your market? Do you offer a bespoke, commissionable service for clients?
For my formative assessment i had just had some fall backs with my work, with the flexi ply being too thick and the need for new designs to compensate, and also having issues with the boxes i made just before easter.
The development I’ve gone through for this project all happened very fast in the last few weeks because of materials. This has made me realize how fast sometimes you’ve got to work to reach a plausible development. From the mistakes i developed the use of the Living hinges in my work which I’m glad have been positively received which initially i wasn’t sure how well they were going to be received since i was focusing on round boxes.
Since receiving my assessment I’ve been working hard on getting bits done finalizing my designs and developing things that have gone wrong in the past few weeks.
The things at the end of my feedback is something I’m working on. There doesn’t look to be many other products like mine that are available on the market at the moment, especially with my living hinge boxes and my round shaker boxes.
With my branding and such I’m planning on having my boxes being bespoke and commissionable for clients, i think i want to stay with my inspiration being architecture this is a interesting thing for people to bring a little bit of architecture into their homes.
Branding
Posted: April 8, 2016 Filed under: Third Year, Third Year Field Leave a commentI wanted to make myself a branding tool for when I’ve made my boxes so i can stamp my maker logo on it. This little project i was planning on taking a afternoon has taken me down lots of different roads and i still don’t know how I’m going to make it.
![]() My first point of call was to get a design together, I knew that I wanted to use my initials for it, all my initials SLCJ. This didn’t take me as long as expected I got a few designs done in about 10 mins with just re sizing and playing around with the placement of the letters, once I got that done I was happy with just having my initials. I then started looking at other stamp designs to see if I needed to add anything else and saw a wax stamp and I liked the shape the wax went around the the rounded stamp, and took that element and added in my initials and got a maker logo/mark I just want made as soon as.
My first point of call was to get a design together, I knew that I wanted to use my initials for it, all my initials SLCJ. This didn’t take me as long as expected I got a few designs done in about 10 mins with just re sizing and playing around with the placement of the letters, once I got that done I was happy with just having my initials. I then started looking at other stamp designs to see if I needed to add anything else and saw a wax stamp and I liked the shape the wax went around the the rounded stamp, and took that element and added in my initials and got a maker logo/mark I just want made as soon as.
I then needed to figure out how the hell I was going to have it made. I started with some wire thinking if I put a current through it it would heat up, this design failed so badly, partly because my piece of wire wasn’t long enough and wasn’t the easiest to bend either.
This then led me to thinking about how I could dremel out the bits I don’t want this didn’t go well either i didn’t want to sit a use the dremel for any longer, did a small test and that failed as well.
After I got angry at the dremel I then thought I would have a look on the internet see what it had to offer. From the internet I found lots of bits that you can upload a image and have it printed for you by shapeways in metal. they had a very handy one would fit on the end of a soldering iron, this would be a good way to be able to monitor the temperature. i then saw one that i just had to give a go, it was a attached to a lighter, you use the lighter to heat it up and stamp.


This i just had to try it so got a badge back and pulled it to pieces, used the dremel to draw out my initials, i did them the wrong way round anyway but the test was successful. Once i had put my initials on it i used some wire to fix it in place to my lighter, very makeshift and rough. The main problem with this is that you can’t tell how how the piece is getting, so my first try on the veneer it just burnt it but the second two i did came out ok.
The problem with doing my stamp like this is that its going to take a lot of time to test and get a material made and done, so i think i might just have to make a rubber stamp and use ink before i finish my boxes.
Lids going on Forever
Posted: March 29, 2016 Filed under: Third Year, Third Year Field Leave a commentNow I’ve decided that I’m going to make different shaped boxes I thought I would get the lid designs done and see how my other designs transferred. After spending a few hours playing around with the round designs being transferred into this new shape.


Seeing them all tiled like this is a really interesting way of me seeing the boxes I’m going to be creating next. I enjoyed taking the same elements from the original box designs and ending up with these really different box lids. Seeing these new designs like this is pushing me to want to make my next lot of boxes as soon as I can, and see how they turn out.
Living Hinges
Posted: March 25, 2016 Filed under: Third Year, Third Year Field Leave a commentI didn’t want to just spend the time looking at the living hinges in the hope I was getting the distances and the thickness right so i started researching living hinges, this made me come across this blog.
https://www.deferredprocrastination.co.uk/blog/category/def-proc/lattice-hinges/
The blog posts about the lattice hinge as they call them were really interesting a lot of the information went straight over my head, but after reading it 3 or 4 times it started to make a little sense. I still didn’t fully get what it was talking about especially with all the equations to figure out little things for the hinge. After a long phone call to my brother who did computer science at university he put the calculations into a excel spreadsheet so i could just input the data to then get what i needed to be able to make my hinges.
This is the link to the excel spreadsheet that my brother created. since he created it i added a few more bits in and I’m pretty sure that they ant completely right but the information i needed is there and simplified for me to be able to create my hinges.
After looking back at the blog with this spread sheet it makes a lot more sense to what my brother was talking about on the phone when he was trying to explain it all to be.
Designing
Posted: March 24, 2016 Filed under: Third Year, Third Year Field Leave a commentAfter thinking about a different shaped box I thought i should do at least one design and see how it transfers into a different shape for the other lids.
 After spending time playing around with the different shape and seeing how the design transfers this has made me really interested in transferring my 6 lid designs into this shape lid and seeing which ones will transfer ok and which ones won’t transfer to this shape.
Living Hinge in Flexi Ply
Posted: March 24, 2016 Filed under: Third Year, Third Year Field Leave a commentAfter my card test i wanted to just see about making a simple living hinge. For this i just used a band saw just to see how close i could get the parts.
i initially tried having a cm between the cuts in the ply


This created a simple bend it reached 90 degrees but didn’t go much further without hearing some of the layers in the ply starting to break. This showed me that the cuts need to be closer together at the edges.
from this i then tested a few different ones some with holes at the ends to see if that would help the flexibility then again with a zigzag path for the corner.


Having the cuts 5mm apart meant that the corner was a lot more flexible and would easily bend over on to itself. these i would still be a little worried that it could break because its such a simple design i would be worried it wouldn’t hold strong enough for the box.


After those tests i thought that going for a slightly harder design, this wasn’t one that i saw online i was just testing to see how this would work. using a dremel to get the elements on the inside. this one flexed to be 90 degrees again roughly but soon after it snapped this is a point in the testing that i needed because i can now see how this could work and the way that it might not work.


After looking at the thicknesses i wanted to have a go at making it shape around a box using the measurements of the ply and the base having a corner radius of 40 mm.
This for a first attempt turned out well i wanted to just see how it would go around the corner. it goes around the corner fine but there was a slight issue with getting the rest of the ply to sit flush against the base. either the base needs to be bigger or the sides need to be smaller.
Living Hinge Tests
Posted: March 23, 2016 Filed under: Third Year, Third Year Field Leave a commentAfter having my problems with the thickness of the ply. I decided that making living hinges would be easy and thought that I could easily figure it out of how to make living hinges using different shapes that would be dependent on the lid designs.
I initially just had a play with some 3mm card 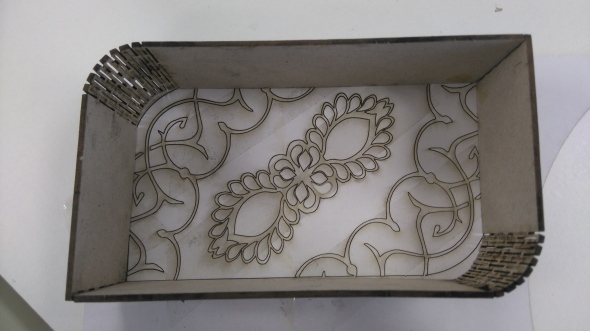 I did a very simple living hinge design for the sides. this was an interesting thing to initially try to see how the basic one moves and the flexibility. from his i wanted to try to see how different shapes worked and how they could develop and make a feature of the hinges. this would then mean i would just veneer one side and cut or CNC it with the veneer on.


Once I tested out the simple version I thought to have a play with a shape from my Gaudis house design this design actually bent really easily. the card didn’t start to snap which was really surprising since i just set it out like the original living hinge.
This is easy to work with especially since the material I’m going to be using with it is flexible to start with.
Flexible but not Flexible Enough
Posted: March 23, 2016 Filed under: Third Year, Third Year Field Leave a commentFor the past boxes I’ve made I’ve been using 3mm flexible ply, this is flexible enough that it will go around my smallest form of 150mm but after running out of 3mm i ordered more from P&P timbers the university suppliers. On the phone when i talked to someone they said that they could get 3mm ply for me but it would just take a couple more days. Once ordered and delivered turns out they delivered 5mm ply. I had to play around with the ply and how flexible it would be but it wasn’t flexible enough to even go around my biggest form of 300mm.
I then had a panic that I wouldn’t be able to make any more boxes other then the set I already have formed, after panicking for a while I had a think about different boxes I looked at and the shapes and other ways I can use the ply. I decided that I could use the 5mm to create boxes using a living hinge.

Recent Comments